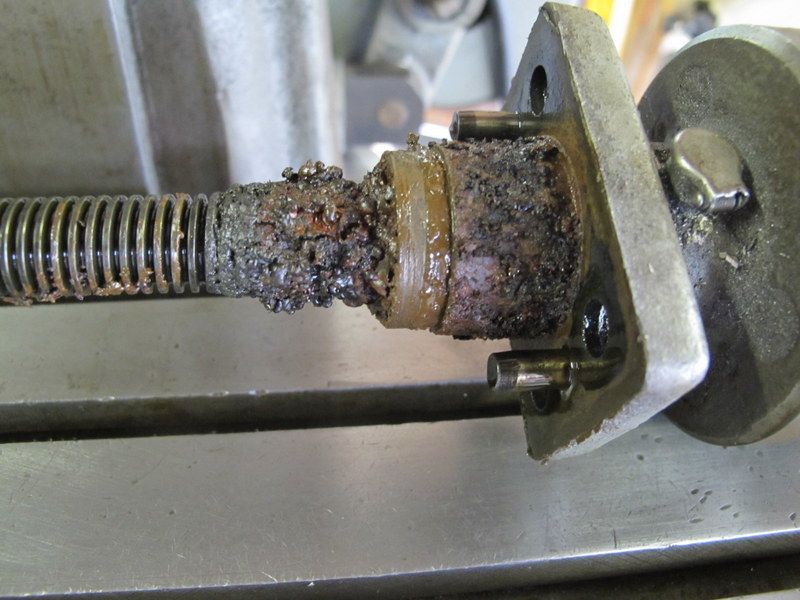
As I was disassembling my Hardinge UM mill to haul it to my basement I pulled the cross slide screw and found this:
![]()
So it was apparent that someone had been using water based coolant on the mill and I should do some work to clean out the insides.
I wanted to remove the saddle, pictured here (only picture I have is when I was removing the knee) . It is supposed to be easy as it just slides off the front. But first you need to remove the cross slide nut. To remove the cross slide nut you need to remove the table.
![]()
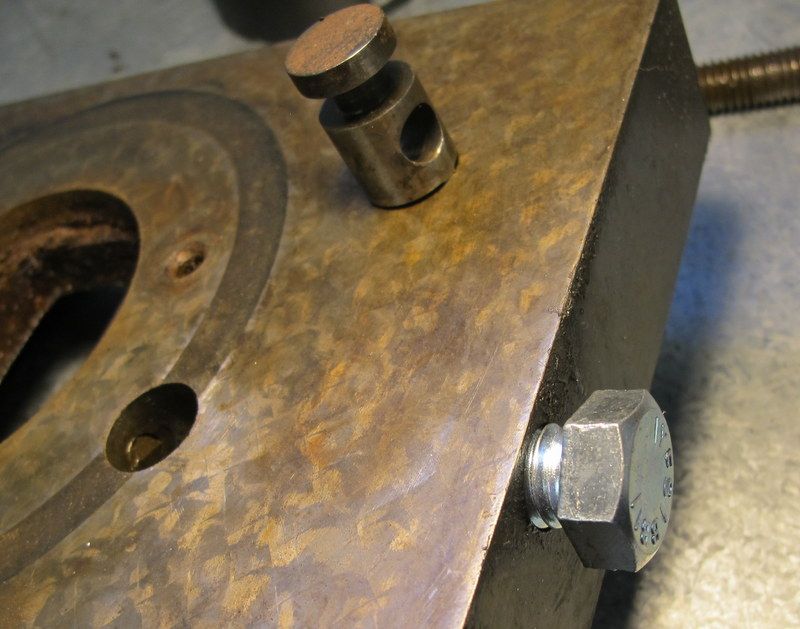
The table is held in place by two T widgets which engage a slot in the table. These are pulled down by the action of a tapered bolt engaging a tapered hole in the widget.
The advice I got was that to remove the table all I would have to do is remove the two bolts and lift. It would be difficult because the accumulation of crud but it would come off.
It was not quite that easy.
![]()
The T widget did not want to come out without a fight. There was a high spot on the side of the hole which prevented the widget from rotating or moving upwards. One widget did come free, you can see where it deformed as it was pulled past the high spot.
![]()
I positioned the table 90 degrees to where it would normally be. That allowed me to put some wood wedges between the table and the knee to provide the required lifting force.
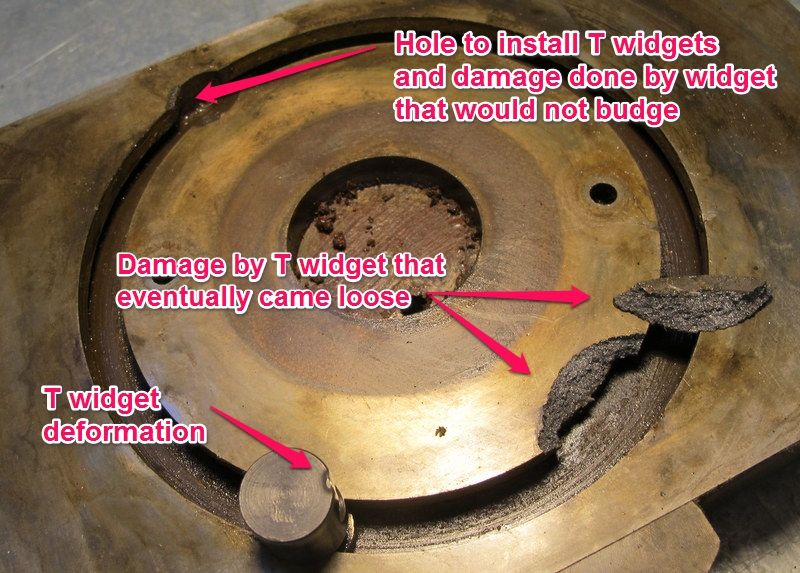
Unknown to me, this placed one of the widgets very close to the hole that allows them to be installed. As pressure was applied one widget made the installation hole bigger, this allowed the table to tip up on one side, and the other widget pried a chunk of the table loose before eventually coming free.
Not a pleasant experience.
![]()
I guess the good news is that because the table was 90 degrees to the normal orientation the damage is in an area I am not likely to use. So I am thinking it can still be used. (Although if someone has an extra one they can sell me I am waiting to hear from you.)
My first thought was that the high spot was raised by the tapered bolt as it was over tightened. But looking at the deformation it does not match the cup in the tip of the bolt. It looks like a punch of some kind was used to create this raised portion. Was this done at the factory? Why hadn't the people who told me how to remove it warned me about this?
The current problem is I need to remove the second widget, and to reassemble I need to be able to push both widgets back into their holes.
I could probably use a Dremel on the open hole, but I need to remove the high spot on the other side while the widget is still in place.
I am thinking that I can take a 9/16 x 12 tpi bolt, drill out the center and create a bushing. I could then use the bushing to position a drill bit in the correct location to drill out the high spot.
![]()
Does anyone have a better idea of how to remove the remaining widget and then put the whole thing back together?
So it was apparent that someone had been using water based coolant on the mill and I should do some work to clean out the insides.
I wanted to remove the saddle, pictured here (only picture I have is when I was removing the knee) . It is supposed to be easy as it just slides off the front. But first you need to remove the cross slide nut. To remove the cross slide nut you need to remove the table.

The table is held in place by two T widgets which engage a slot in the table. These are pulled down by the action of a tapered bolt engaging a tapered hole in the widget.
The advice I got was that to remove the table all I would have to do is remove the two bolts and lift. It would be difficult because the accumulation of crud but it would come off.
It was not quite that easy.

The T widget did not want to come out without a fight. There was a high spot on the side of the hole which prevented the widget from rotating or moving upwards. One widget did come free, you can see where it deformed as it was pulled past the high spot.

I positioned the table 90 degrees to where it would normally be. That allowed me to put some wood wedges between the table and the knee to provide the required lifting force.
Unknown to me, this placed one of the widgets very close to the hole that allows them to be installed. As pressure was applied one widget made the installation hole bigger, this allowed the table to tip up on one side, and the other widget pried a chunk of the table loose before eventually coming free.
Not a pleasant experience.
I guess the good news is that because the table was 90 degrees to the normal orientation the damage is in an area I am not likely to use. So I am thinking it can still be used. (Although if someone has an extra one they can sell me I am waiting to hear from you.)
My first thought was that the high spot was raised by the tapered bolt as it was over tightened. But looking at the deformation it does not match the cup in the tip of the bolt. It looks like a punch of some kind was used to create this raised portion. Was this done at the factory? Why hadn't the people who told me how to remove it warned me about this?
The current problem is I need to remove the second widget, and to reassemble I need to be able to push both widgets back into their holes.
I could probably use a Dremel on the open hole, but I need to remove the high spot on the other side while the widget is still in place.
I am thinking that I can take a 9/16 x 12 tpi bolt, drill out the center and create a bushing. I could then use the bushing to position a drill bit in the correct location to drill out the high spot.
Does anyone have a better idea of how to remove the remaining widget and then put the whole thing back together?